Creating Your First AWS RDS Database with Stackery


Once you've built your first Lambda, you’ll need a datastore.
AWS does have an official instruction guide to help with this, but the official AWS instruction guide is extensive. You need to set up at least four resources before you can deploy your first RDS table, and by the time their 2,000-word guide is done you still haven't even selected your DB format.
Thankfully there's a much easier way: The deployment service Stackery, can get your RDS up and running and hooked up to Lambdas in just a few minutes.
Getting Started with RDS
AWS's Relational Database Service (RDS) is a good choice if you're familiar with SQL databases already or just prefer the reliable classic of tables over NoSQL.
At first glance, RDS looks like it’s basically just database hosting from Amazon, but in reality, it's very different from their traditional server options hosted on EC2. When looking the tooling closely, it’s obvious RDS is as different from a traditional DB as a Lambda is different from a web server.
A few key differences:
- No OS management — While you can select the exact DB type and version (e.g., PostgreSQL, MySQL, MariaDB, Oracle, Microsoft SQL Server, Aurora) the operating system level is fully virtualized
- AWS's usual restrictive access policies — Centrally, this is a positive thing: Amazon forces you to be in tight control of what services can access each other. As a result most beginners often end up stumped when, after trying to stand up their RDS, they want to connect to it from their laptop.
- Indescribably smooth uptime management — With the concept of an Availability Zone (AZ) you can create multiple instances that Amazon can automatically use for failover
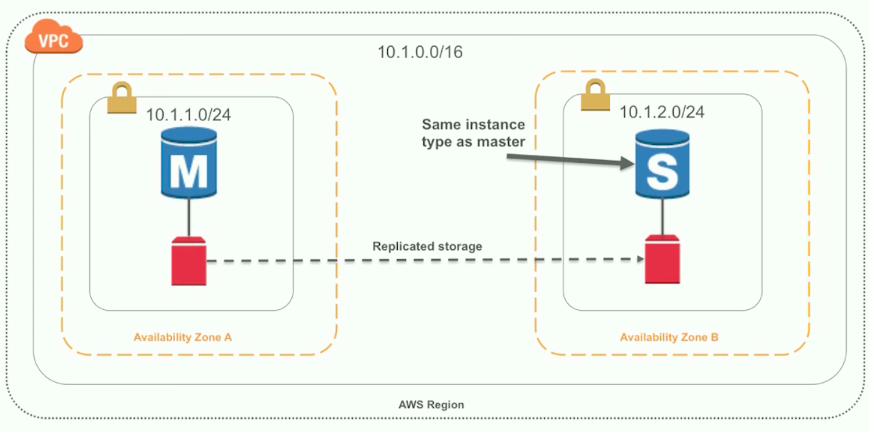 (Seen here: two availability zones in action)
- And finally, backups and scaling are simpler — Because if virtualization doesn't make scaling and backups easier, what the heck is it even for, right?
Deploy an RDS Table
Start by creating a new Stack in the Stackery UI and deleting the default nodes. We'll add one node for our database and a second for a lambda to access DB data. You'll need to set a DB name. Note that this is not the database name for DB requests, just the name it'll be referred to in the Stackery UI. Set a root password here as well. Be sure to record the password somewhere for later use in this tutorial.
For the moment, our Lambda function will be fine with the default settings, but we'll edit it later to retrieve records from the database.
This tutorial doesn't cover populating the database in detail, since the most likely scenario is that you’ll have test data you'd like to populate. Let's set up our Lambda to load records from the account DB.
To get access to edit your Lambda's code: commit this stack in the Stackery UI (no need to deploy yet), then click the commit ID to go to the stack code in Github.
Next, clone the repository. Then you can edit it in whatever editor you prefer.
Let's populate the Lambda with some code to access records from the DB:
const knex = require('knex');
cont dbInfo = {
  development: {
    client: 'mysql',
    connection: {
      host: 'localhost',
      user: 'root',
      password: 'mySecretPW',
      database: 'accounts'
    }
  },

  production: {
    client: 'mysql',
    connection: {
      host,
      user: 'root',
      password: process.env.DB_PASSWORD,
      database: 'accounts'
    }
  }
};

const connectionName = process.env.CONNECTION || 'development';
const connection = dbInfo[connectionName];

/**
 * Fetch list of accounts from database and respond with an array of account
 * names.
 */
module.exports = async message => {
  const client = knex(connection);

  try {
    const records = await client('accounts').select('name');
    return records.map(record => record.name);
  } finally {
    client.destroy();
  }
};
A few things to note about this code:
- As is the default for new Lambda Resources in Stackery, this is written in Node 8, with support for
finally{}. - This code relies on inline connection info, but you'll more likely want to share that info between multiple functions — See how to share code modules between Javascript functions in a separate guide.
- If you've written code to access a database from a web app, you might be surprised to discover we're creating and destroying a client for every request. Since we're deploying this code to a serverless environment, it's critical that we don't max out our connections on smaller RDS instances. It's quite easy for multiple requests to our Lambda to result in a point of 65 simultaneous connections, which is the limit on a db.t2.micro instance — We’ve previously discussed database connection usage in a serverless context on our blog.
Push the new Lambda code up to the GitHub repository, and refresh the Stackery UI to show your updates.
The last step is to give the Lambda function the database password. It expects to find it as a config variable for this Lambda — which you can set from the Stackery UI — but this isn't an ideal place to put the password, since it will be visible in both the Stackery UI and the GitHub repo for this stack.
Instead, set two environment variables CONNECTION to production and DB_PASSWORD to ${config.dbPassword}, so the password will be populated from the environment config.
You can access 'environments' from the menu at the top right. Finally, set any environment variables as standard Javascript Object Notation (JSON).
Now your stack should be ready to commit, prepare, and deploy!
Related posts