Deploying a serverless data processing workflow with AWS Step Functions


This is the first of a two-part blog series. In this post we'll use Stackery to configure and deploy a serverless data processing architecture that utilizes AWS Step Functions to coordinate multiple steps within a workflow. In the next post we'll expand this architecture with additional workflow logic to highlight techniques for increasing resiliency and reliability.
The tutorial below is long, but we've broken it down in simple terms— so stay with us!
AWS Step Functions is a service that allows developers to define and run applications as a coordinated set of activities within a workflow (state machine) by providing high level primitives that focus on clearly separating workflow logic from business logic. As outlined in this article by Yan Cui, Step Functions should be considered for business critical workflows, complex workflows, or long running workflows— especially when outside stakeholders such as business people or support staff get value from being able to visualize the workflow during or after every execution.
Since its release in 2016, there has been quite a bit of buzz in the media as more and more teams look to it to simplify certain workloads. In late 2018 Step Functions received a notable update that included several new integrations with notable services such as SNS, SQS, DynamoDB, and SageMaker (to name a few). Recently my colleague Jun and I got into a discussion about various use cases for Step Functions and decided to collaborate on an example implementation.
In this example, we use Step Functions to automate a payroll processing application that highlights several key concepts and techniques that are general enough to be used in the development of architectures that require message passing, coordination between multiple microservices, and interaction with AWS services via SDK calls.
GitHub Repo Layout
We created the following repo for you to follow along and get your hands dirty: https://github.com/stackery/state-machine-examples
The master branch includes a starting point where you'll find a generic state machine and 4 functions.
The payroll-processing-1 branch includes the payroll processing example that we'll expand upon in this post.
In part two of this blog series, a new branch named payroll-processing-2 will be added with additions explained in that post. Stay tuned!
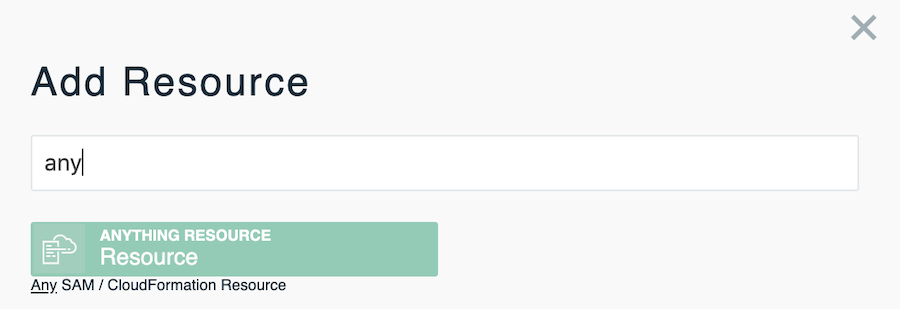
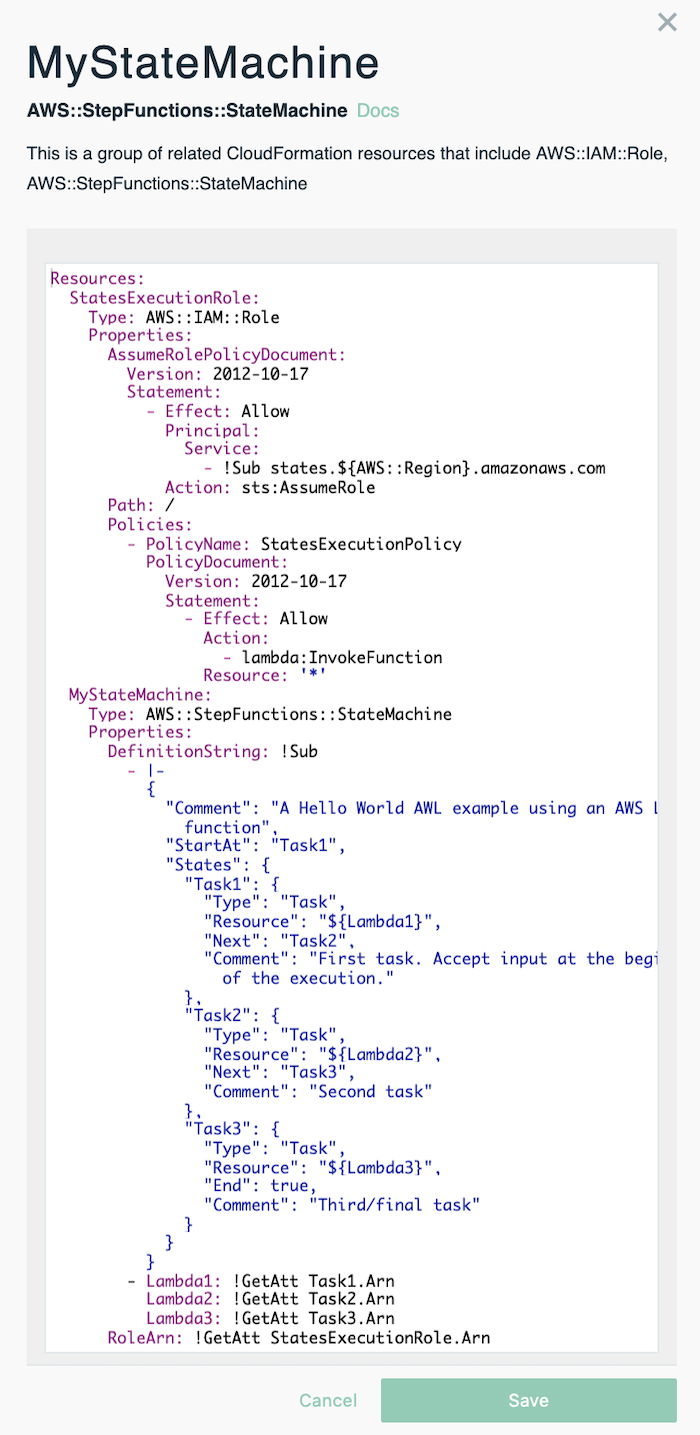
To create a starting point, we put together a state machine within Stackery by selecting the Anything Resource and populating it with the code that you see below and in lines 72 -125 of the template.yaml file in the master branch. The Anything Resource is extremely handy for inputting any valid SAM or CloudFormation resource that you'd like to include in your application stack. We referenced this AWS::StepFunctions::StateMachine doc to familiarize ourselves with the syntax:
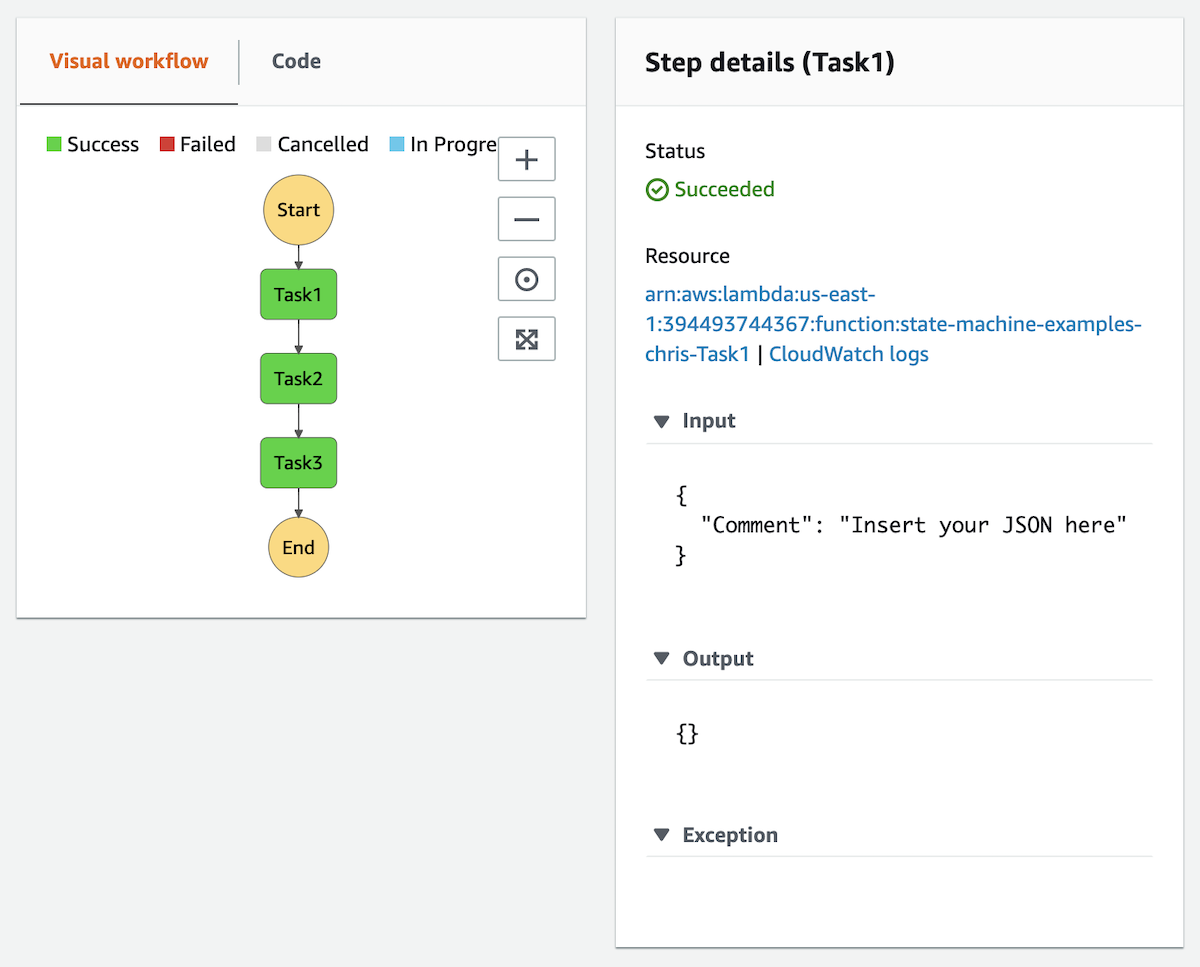
To test this generic state machine, deploy the stack based on the master branch then go to https://console.aws.amazon.com/states/home to find the state machine that you just deployed. Click the 'Start execution' button and then you'll see dialog box/popup window with an optional input section, no need to change or add anything, just hit the 'Start execution' button within this popup window.
The state machine will execute and produce a visualization as seen below. Here you can click on each element of the workflow to inspect the status, inputs, outputs, and a host of other metadata specific to that execution.
Application Architecture
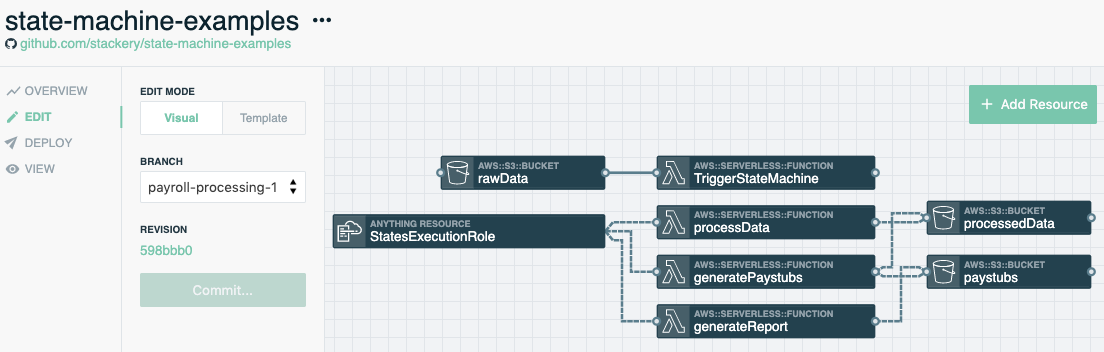
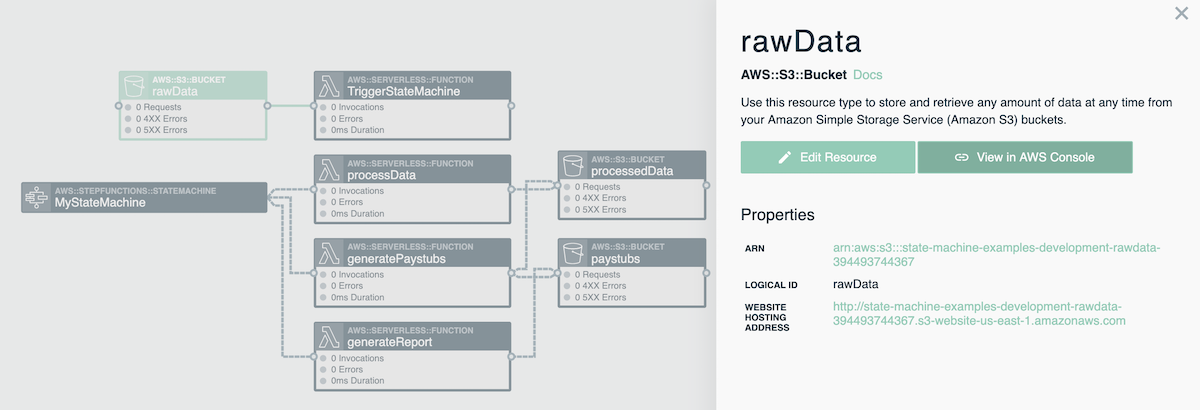
Within the Stackery UI, we visually designed and configured the AWS resources that we wanted to include. We decided to use 4 functions, 3 buckets, and 1 state machine. Once we laid out the functions and buckets resources and connected the wires we made some additions to the infrastructure as code and scoped permissions that you see in this template within the payroll-processing-1 branch. We then used the Stackery CLI to iterate on our laptops within the context of a deployed cloudside development environment.
The rawData S3 bucket represents the entry point for data coming into our application and the solid wire that connects the rawData S3 bucket to the TriggerStateMachine function indicates an event subscription. Whenever an object is created or removed from the bucket the function is invoked with the relevant event data at which time it parses the event to pull the bucket name, object key, and timestamp. The function puts those 3 fields into a json message and invokes the state machine that we describe in the next section.
Building the Workflow
Below is the definition of the state machine we created. You can reference it by looking at lines 137-169.
We have 3 sequential steps in the state machine all of which are of the type task. Tasks represent a single unit of work performed by a state machine. For more information on the 7 types of states check out these two links from AWS: concepts-states, amazon-states-language-states.
Each of the tasks we defined will receive an input, perform work, and then pass an output to the next state. The state machine is responsible for the durability of the data passed between steps, handling any retry logic, and triggering and tracking each step. Furthermore, the state of each step is automatically logged and retained for 90 days.
MyStateMachine:
  Type: AWS::StepFunctions::StateMachine
  Properties:
    DefinitionString: !Sub
      - |-
        {
          "Comment": "Payroll processing example.",
          "StartAt": "processData",
          "States": {
            "processData": {
              "Type": "Task",
              "Resource": "${Lambda1}",
              "Next": "generatePaystubs",
              "Comment": "First task. Accept input at the beginning of the execution."
            },
            "generatePaystubs": {
              "Type": "Task",
              "Resource": "${Lambda2}",
              "Next": "generateReport",
              "Comment": "Second task."
            },
            "generateReport": {
              "Type": "Task",
              "Resource": "${Lambda3}",
              "End": true,
              "Comment": "Third/final task."
            }
          }
        }
      - Lambda1: !GetAtt processData.Arn
        Lambda2: !GetAtt generatePaystubs.Arn
        Lambda3: !GetAtt generateReport.Arn
    RoleArn: !GetAtt StatesExecutionRole.Arn
Building the Lambda Functions
We separated the business logic into the following four functions:
This function is invoked whenever an object is created or removed from the rawData bucket. It parses the event to pull the bucket name, object key, and timestamp. The function puts those 3 fields into a json object that it passes to the state machine as input.
This function is invoked by the state machine. It parses the event it receives and performs a getObject call to S3 to retrieve the object from the rawData bucket. Scripts are then run to munge (transform and map) the data so that all the jobs for a specific employee are written to individual CSV files. Each individual CSV file is put into the processedData S3 bucket under a specific prefix. Finally, the function adds data to the event object and returns it to the state machine.
This function is invoked by the state machine. It parses the event it receives and performs a listObject call to S3 to get a list of all the objects in the processedData bucket. Scripts are then run to retrieve each object from the processedData bucket, calculate earnings, and then write formatted paystub output to a pdf file for each employee as well as a single rollup.csv file that contains all data within each paystub. Each individual file is put into the paystubs S3 bucket under a specific prefix. Finally, the function adds data to the event object and returns it to the state machine.
This function is invoked by the state machine. It parses the event it receives and performs a getObject call to S3 to retrieve the rollup.csv object from the paystubs bucket. Scripts are then run to format a report that is saved as a PDF and CSV. Each report is put into the paystubs S3 bucket under a specific prefix. Finally, the function adds data to the event object and returns it to the state machine.
In each of the functions you'll find code that interacts with AWS.StepFunctions and/or AWS.S3 via the AWS SDK for JavaScript in Node.js. There are also comments throughout the code to indicate where alternatives could have been used as well as show domain specific business logic that would be coded in a full implementation of a project like this.
Something worth considering for addition to an application like this is input validation of the file that goes into the rawData bucket, either at the bucket level or within the TriggerStateMachine function.
Visualizing the Workflow
To invoke this application, deploy the stack and then upload a file into the rawData bucket. A simple way to get to the bucket from within Stackery is to go to the view pane and double click on the rawData resource and then click on the 'View in AWS Console' button.
Upload any file to the S3 bucket and watch as the state machine is invoked by the TriggerStateMachine function. In my case, I created a test file at the command line by running the following: echo "test data within input.xls file" > test.xls
I then uploaded the test.xls file into the rawData bucket and navigated to the Step Function within the AWS console. From here I was able to look at all types of information specific to this execution in addition to information on past executions.
I found it really easy to reason about and even easier to explain to others who were curious to check it out. Ever heard the adage "a picture is worth a thousand words"?
From within this visualization, I can easily see the inputs to the overall state machine or individual steps within it and can instantly troubleshoot various aspects of the workflow.
More importantly, any other stakeholders in the business could troubleshoot and inspect this workflow with relative ease as well which to me is the real sweet spot of AWS Step Functions.
At a certain scale the cost may outweigh the benefits, but for many business applications that run at a moderate scale, the nominal cost of Step Functions and its ability to cleanly separate workflow logic from business logic makes it a strong contender.
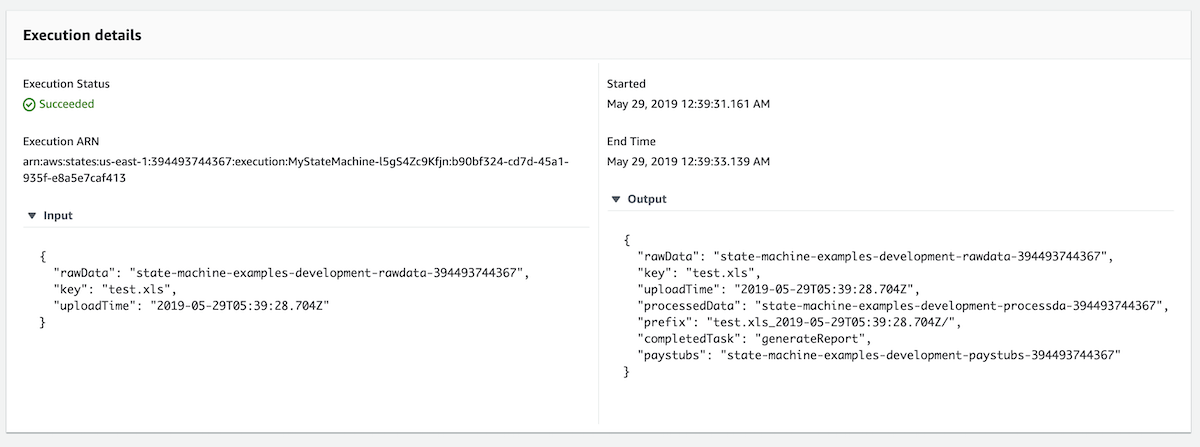
Execution details
In this screenshot you can see the Input to the overall state machine as well as the final output.
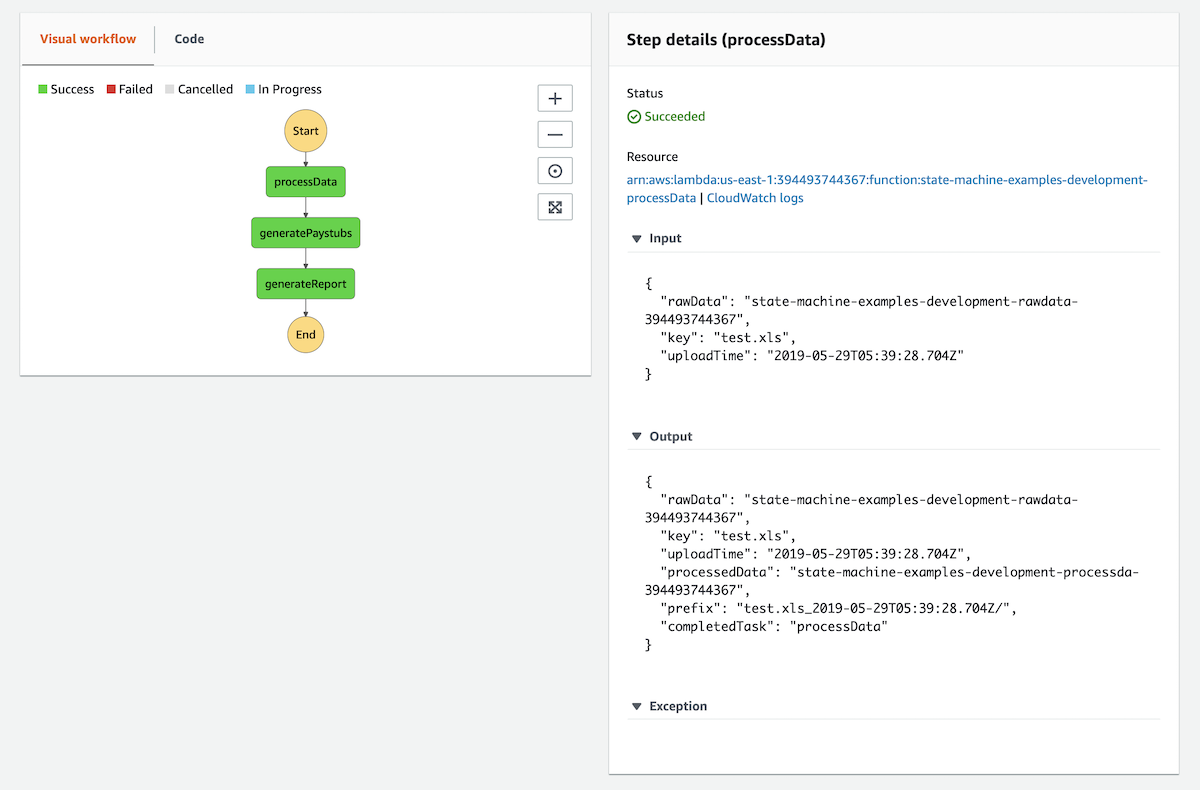
Step details (processData)
In this screenshot you can see the Input that was sent to the first task in our workflow as well as the output that was sent to the second task.
Notice how the Output contains information added by this Lambda function:
-
processedData
-
prefix
-
completedTask
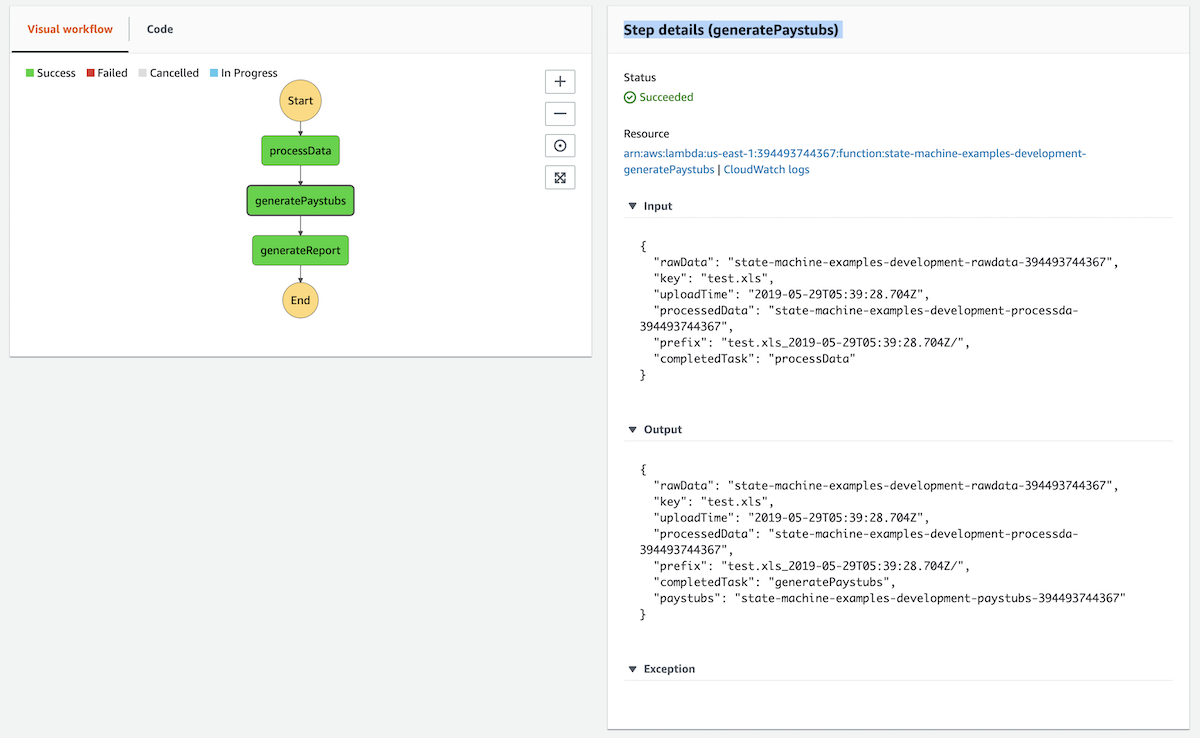
Step details (generatePaystubs)
In this screenshot you can see the Input that was sent to the second task in our workflow as well as the output that was sent to the third task.
Notice how the Output contains information added by this lambda function:
-
completedTask
-
paystubs
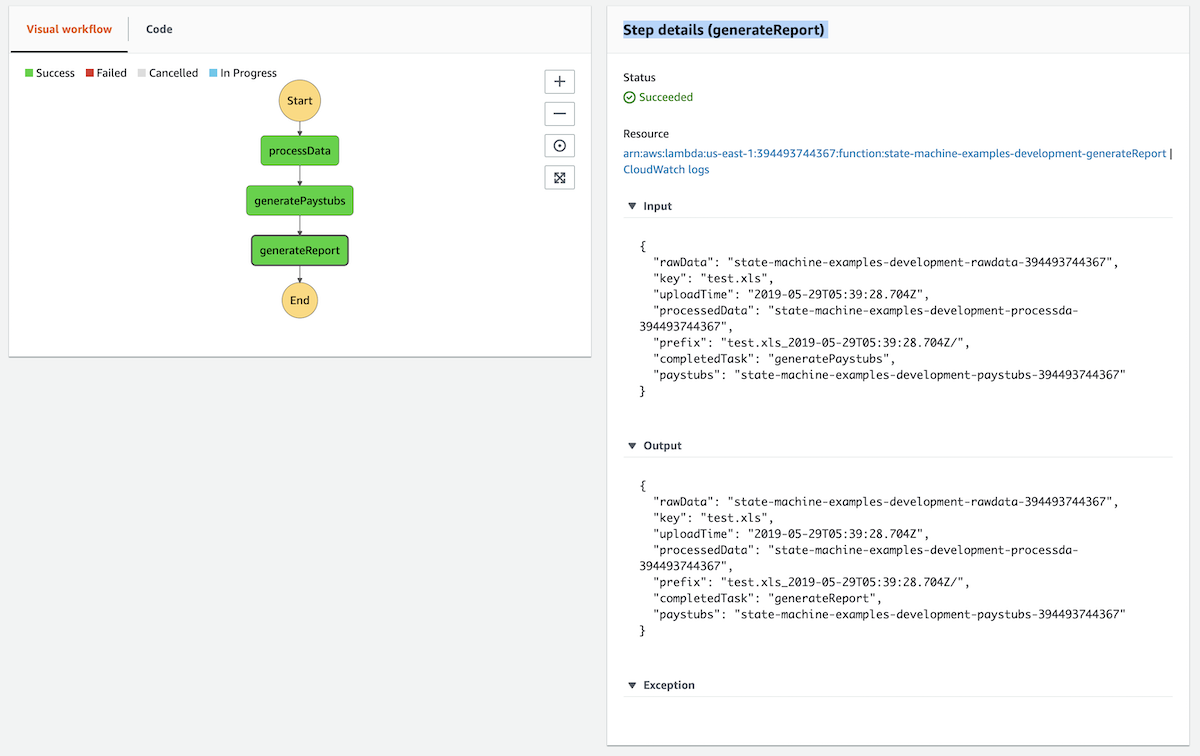
Step details (generateReport)
In this screenshot you can see the Input that was sent to the third task in our workflow as well as the output that was sent back to the state machine at the end of the workflow.
Notice how the Output contains information added by this Lambda function:
- completedTask
What Next?
In the next post we'll add some features to this example to showcase techniques for increasing resiliency, reliability, integration, and flexibility to our example architecture. I don't want to spoil the surprise so I'll just leave it at that :)